Multiboot Microsoft Windows, OpenBSD and Slackware Linux
1381 words, 7 minutes
I got a refurbished Lenovo ThinkPad X1 Carbon Gen 10 and I’m not really happy with how the fan is managed by OpenBSD. Plus, the ThinkPad A485 running Windows for $WORK has been freezing quite a few times recently. So I decided I could try using a single ThinkPad for both $WORK and $HOME using different Operating Systems. I recently loved Slackware Linux again and wished I could use it too on that machine.
So this is how I configured a multiboot environnement on the ThinkPad with Microsoft Windows 11, OpenBSD 7.3 and Slackware Linux 15.0. Note that I will encrypt as much storage as possible using the various available OS technologies.
Install Windows
The X1 Carbon I got ships with Windows 11 by default. I used the LenovoRecovery tool to restore the laptop in its original state and update every firmware that was available.
Once restored, Windows eats all the disk space.
Reclaim some storage
Use the Disk Manager to shrink the actual Windows partition.
Use diskpart to create a partition that will be dedicated to OpenBSD. This
allows all the complicated numbers (offset, size…) to be prefiled. The
partition will then be edited in OpenBSD’s installer.
DISKPART> SELECT DISK 0
DISKPART> CREATE PARTITION PRIMARY SIZE=262144
DISKPART> LIST PARTITION
  N° partition  Type          Taille  Décalage
  ------------  ------------  ------  --------
  Partition 1   Système        260 M  1024 К
  Partition 2   Réservée        16 M   261 M
  Partition 3   Principale     144 G   277 M
* Partition 5   Principale     256 G   144 G
  Partition 4   Récupération  2000 M   929 G
Windows now seats on 144GB of storage and OpenBSD will get 256GB.
Note that BitLocker is not configured (yet). It’ll be later.
Install OpenBSD
Read the Multibooting FAQ .
Boot the OpenBSD 7.3 installer using your preferred media. I used a Ventoy USB stick.
Proceed to installation as usual.
The only specific bits are related to disk setup.
The OpenBSD target partition I created appears as #3 in fdisk.
• Encrypt the root disk? sd0
• Use (W)hole disk MBR, whole disk (G)PT or (E)dit? e
sd0: 1> edit 3
Partition id: A6
Partition offset: <ENTER>
Partition size: 536870912
Partition name: OpenBSD
sd0: 1> write
Writing GPT.
sd0: 1> quit
• New passphrase: (...)
• Re-type passphrase: (...)
• Which disk is the root disk? sd2
• Use (W)hole disk MBR, whole disk (G)PT or (E)dit? g
• Use (A)uto layout, (E)dit auto layout or create (C)ustom layout? a
• Which disk do you wish to initialize? done
From there, proceed as usual.
At the end of the installation process, when the bootloader is being installed, the whole process dies.
• installboot: no OpenBSD partition
• Failed to install bootblocks.
• You will not be able to boot OpenBSD from sd2.
We’ll have to solve this manually.
Solve the bootloader installation failure
The problem is that the EFI System Partition does not appear properly in the disklabel. Let’s switch to the installed system:
# chroot /mnt
# export TERM=vt100
Check where the ESP is located:
# fdisk sd0
(...)
   #: type     [ start:    size ]
---------------------------------
   0: EFI Sys  [  2048:  532480 ]
LenovoRecovery and/or Windows create a loads of partitions that won’t be used
by OpenBSD. Some are recognized, some are not. They appear as “unknown” or
“MSDOS” partition in disklabel. I decided to remove them all and only keep
the ESP as “i”.
# disklabel -e sd0
#       size  offset  fstype [fsize bsize cpg]
(...)
  i:  532480    2048   MSDOS # EFI System Partition
The ESP can now be mounted and the bootloader installed:
# mount -t msdos /dev/sd0i /mnt
# mkdir /mnt/EFI/OpenBSD
# cp /usr/mdec/BOOTX64.EFI /mnt/EFI/OpenBSD/
# umount /mnt
Windows and Linux expect the BIOS date to be localtime. But OpenBSD expects it to be UTC. This leads to bad date/time when switching from one OS to the other. To configure OpenBSD to use local time, modify it’s configuration.
Europe/Paris is UTC+2. This means 2 hours past UTC, hence 120 minutes.
# echo kern.utc_offset=120 >> /etc/sysctl.conf
OpenBSD cannot be booted yet from the disk. We’ll solve this from Windows
o_O
# exit
# reboot
Register the OpenBSD EFI bootloader
A great help was found on reddit , believe it nor not :p Thanks a lot u/reinis_m!
When back on Windows, run a Command Prompt as Administrator. And issue a few magic spells:
› bcdedit /copy "{bootmgr}" /d "OpenBSD"
L'entrée a été correctement copiée dans {xxxxxxxx-xxxx-xxxx-xxxx-xxxxxxxxxxxx}.

› bcdedit /set "{xxxxxxxx-xxxx-xxxx-xxxx-xxxxxxxxxxxx}" path \EFI\OpenBSD\BOOTX64.EFI
L'opération a réussi.

› bcdedit /set "{fwbootmgr}" displayorder "{xxxxxxxx-xxxx-xxxx-xxxx-xxxxxxxxxxxx}" /addfirst
L'opération a réussi.
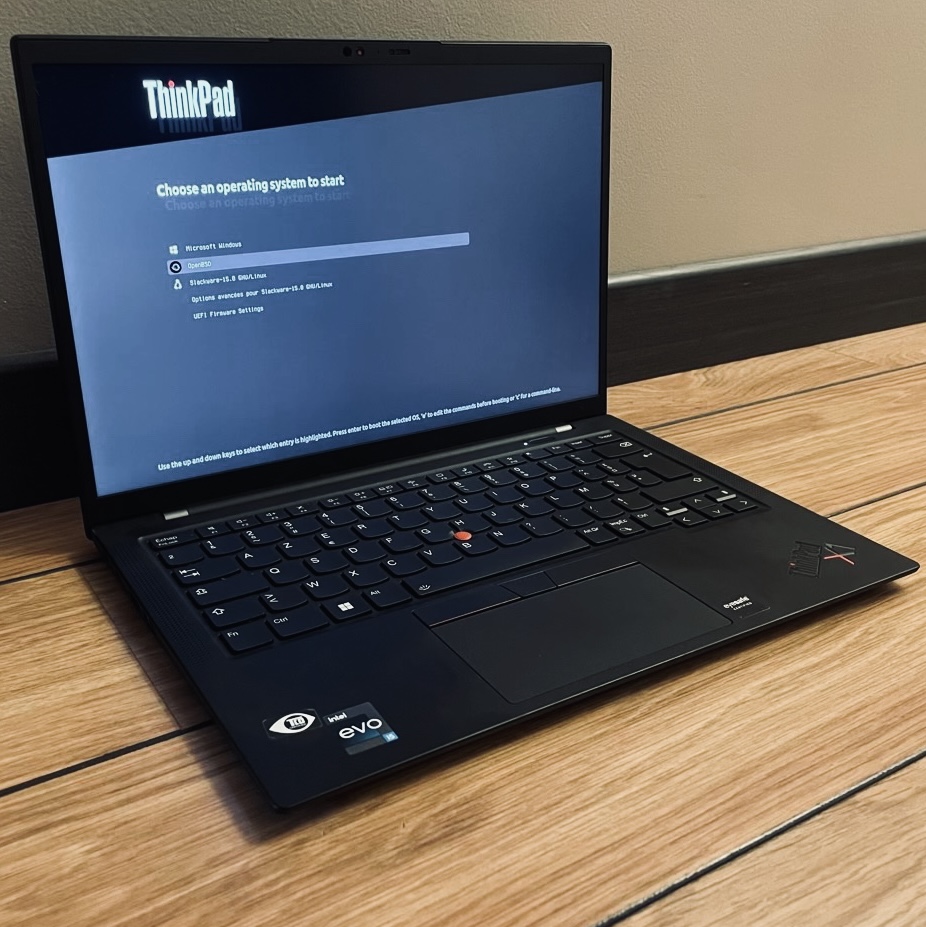
Now, we can reboot and see the OpenBSD bootloader starting automatically.
On the ThinkPad, hit <F12> to access the Boot Menu.
From there, select OpenBSD or Windows to boot the one you want :)
You can probably do better within Windows. You can also install something like
rEFInd. I am going to use Grub, from the Slackware installation.
Install Slackware Linux
I’ll be using Slackware Linux 15.0, because I like -STABLE stuff. On that particular X1 Carbon, the provided 5.x Linux kernel does not expose the video card properly. The console works but there is no DRM driver attached. So I’ll be using the 6.x Linux kernel that ships in -CURRENT. So far, this seems to be enough.
Once the Slackware installation image has booted, setup the keyboard layout and log in as root.
The disk layout has to be done before launching the setup. I basically
went for a setup like this
.
This only difference is that I don’t encrypt the /boot partition. I know
that this leads to endless discussions online. But my point are:
- I don’t want to struggle with LUKS versions and Grub support.
- I don’t want to struggle with LUKS keys to prevent Grub asking the passphrase twice.
- I don’t want to struggle with the Slackware initrd tree not being ready for encryption keys.
- I just want my familly photos to be kept “secret” if I loose my laptop.
- If I ever loose my laptop and someone brings it back to me, my first step will be to reinstall everything from scratch (and backups).
That being said, the setup goes:
# cfdisk /dev/nvme0n1

# cryptsetup -y luksFormat /dev/nvme0n1p7
# cryptsetup luksOpen /dev/nvme0n1p7 tatooine
vgcreate slacker /dev/mapper/tatooine
lvcreate -L 20G      -n swap slacker
lvcreate -L 128G     -n root slacker
lvcreate -l 100%FREE -n home slacker

# mkswap /dev/slacker/swap
# setup
• SOURCE MEDIA SELECTION
• Please select the media from which to install Slackware Linux
^Z
# umount /mnt/boot/efi
# mount -t vfat /dev/nvme0n1p1 /mnt/boot/efi
fg
The umount / mount steps are needed so that the EFI is installed on the disk and not on the Ventoy virtual USB stick.
When asked to install a bootloader, kindly refuse.
• Skip making a USB boot stick
• Skip installing LILO
• Do not install ELILO
(...)
• Exit Slackware Linux Setup
• Slackware Linux Setup is complete, open a Shell
Update Slackware
The installer image is quite old. I like to update the whole system before doing anything else:
# chroot /mnt

# nvi /etc/slackpkg/mirrors
https://mirrors.slackware.com/slackware/slackware64-15.0/

# dhcpcd eth0
# slackpkg update
# slackpkg upgrade-all
The 6.1.42 kernel sources were build on another machine. Using upgradepkg
gets them installed on this system. Then a custom initrd image is built.
# upgradepkg kernel-*-6.1.42*.txz
# $(/usr/share/mkinitrd/mkinitrd_command_generator.sh -i -k 6.1.42 -r)
Install and configure Grub
The grub package belongs to the Slackware installation.
A few commands are required to actually use it. While we’re there, let’s
installed a grub theme.
# grub-install /dev/nvme0n1

# mkdir /boot/grub/themes/thinkpad
# cd /boot/grub/themes/thinkpad
# wget -O - \
  https://github.com/AdisonCavani/distro-grub-themes/releases/download/v3.2/thinkpad.tar \
  | tar xf -
# wget -O icons/openbsd.png https://www.iconfinder.com/icons/401302/download/png/64

# vi /etc/default/grub
(...)
GRUB_DISABLE_OS_PROBER=true
GRUB_PRELOAD_MODULES=all_video
GRUB_GFXMODE=1920x1200
GRUB_THEME="/boot/grub/themes/thinkpad/theme.txt"

# vi /etc/grub.d/40_custom
menuentry 'Microsoft Windows' --class windows {
  insmod part_gpt
  insmod fat
  search --no-floppy --fs-uuid --set=root xxxx-xxxx
  chainloader /efi/Microsoft/Boot/bootmgfw.efi
}

menuentry 'OpenBSD' --class openbsd {
  insmod part_gpt
  insmod fat
  search --no-floppy --set=root --file /EFI/OpenBSD/BOOTX64.EFI
  chainloader /EFI/OpenBSD/BOOTX64.EFI
}

# grub-mkconfig -o /boot/grub/grub.cfg

# exit
# reboot
The laptop would now reboot and display the Grub bootloader. There should be entries for all three installed OSes. BitLocker can now be enabled on Windows. During my testings, I changed the partitions sizes and this screwed up BitLocker. The solution is to use the Microsoft recover procedure, disable it and re-enable.
I hope this didn’t wrecked your laptop ;-)